Death Guard 30K→40K Corruption Paint Scheme
I painted my Death Guard purple. They looked fine. Then I sort of ripped every one of them off their bases and started over. I didn’t really want fine, I was looking for something cool af.
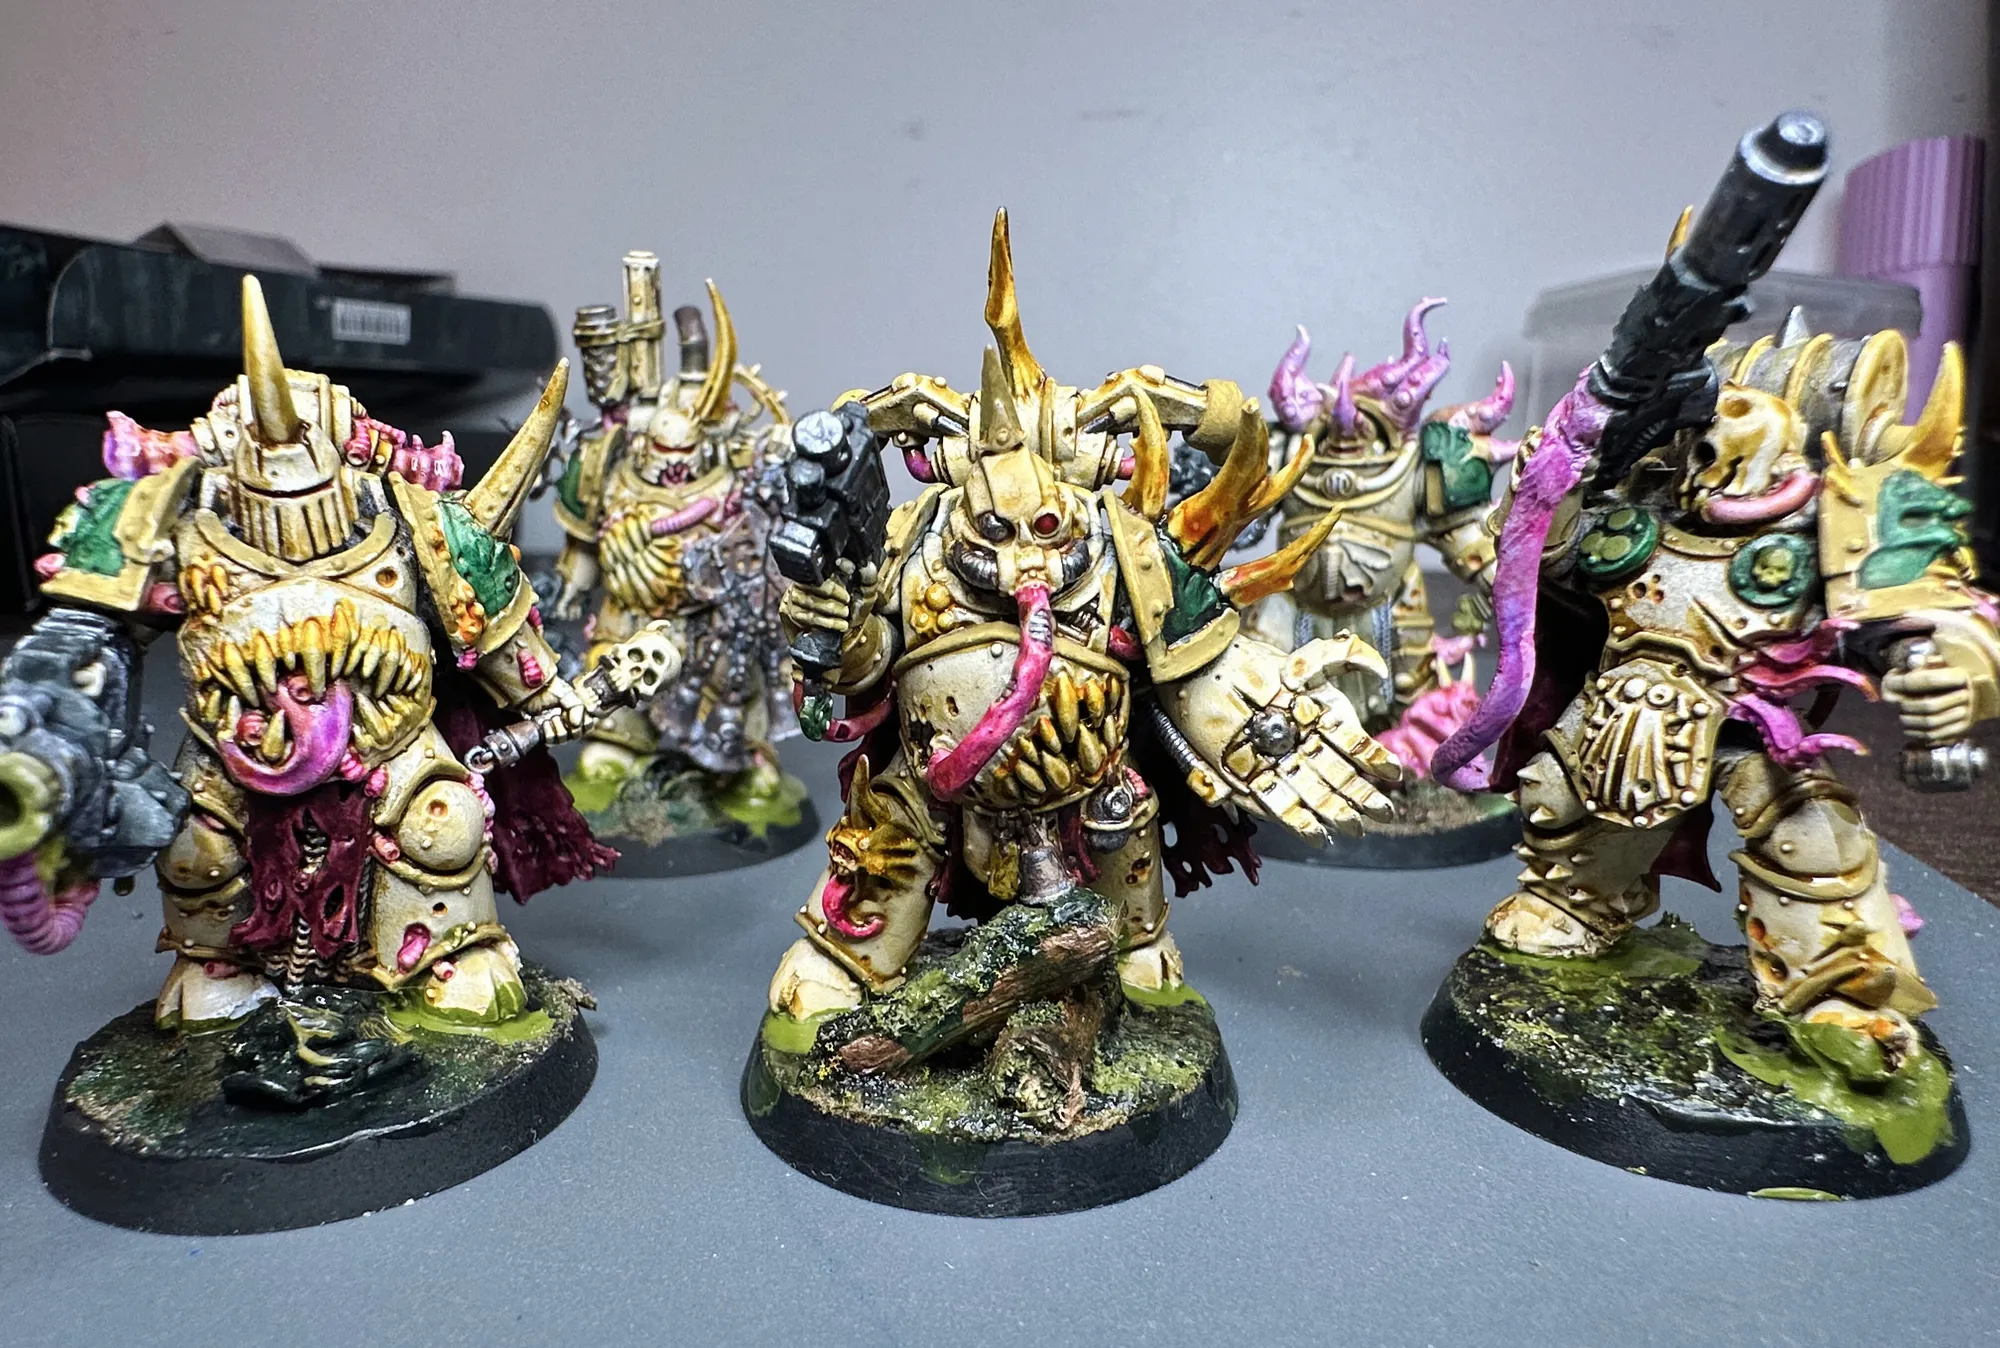
I’d recently seen the 30K Pre-Heresy Death Guard scheme and something just clicked. These guys weren’t always bloated plague carriers stumbling through toxic fog. They were legionnaires. Clean ivory armor, dark green trim, pride in what they were. The corruption came later. To me, this original scheme looked way cooler and more fun to paint than their traditional 40K colors.
So the concept became: paint them like 30K marines first, then let the Nurgle gifts tell their own story on top. Bone-white armor that’s still fighting to look clean, with sickly yellows and pinks pushing through wherever the warp has gotten its hooks in.
One thing worth mentioning: since these were repainted over a previous scheme, I think the old paint underneath actually helped. There’s a subtle grime and unevenness you get from repriming over a painted model that you don’t get on fresh plastic. Happy little accident.
The Recipe
This is the order I paint them. It’s not the only way, but it’s what works for moving through a model without constantly going back to fix things you’ve painted over.
Armor Foundation
The armor is the biggest surface area, so get this looking good and everything else will fall into place (hopefully).
| Step | Where | Paint |
|---|---|---|
| 1 | Armor, bones, skulls | Pallid Bone — Speed Paint |
| 2 | Pin wash in armor recesses | Sepia Wash |
Prime white first, sort of a full opaque coverage. Speed paints are translucent, so any grey showing through the primer will dull the bone color. You want it brighter and cleaner here because everything that comes after is going to dirty it up. That being said, you can see where some previous color is showing through, it gives the speed paint a sort of spotted appearance when put over top of it. For the Death Guard, I think it fits.
The sepia wash goes into the recesses only (armor, cracks & shadow spots, not really all-over). This keeps the flat armor panels cleaner while giving you definition in the cracks and panel lines. That contrast between clean panels and dark recesses is what will sell the “this was once pristine armor” look.
Main Colors
| Step | Where | Paint |
|---|---|---|
| 3 | Shoulder armor panels | Absolution Green — Speed Paint |
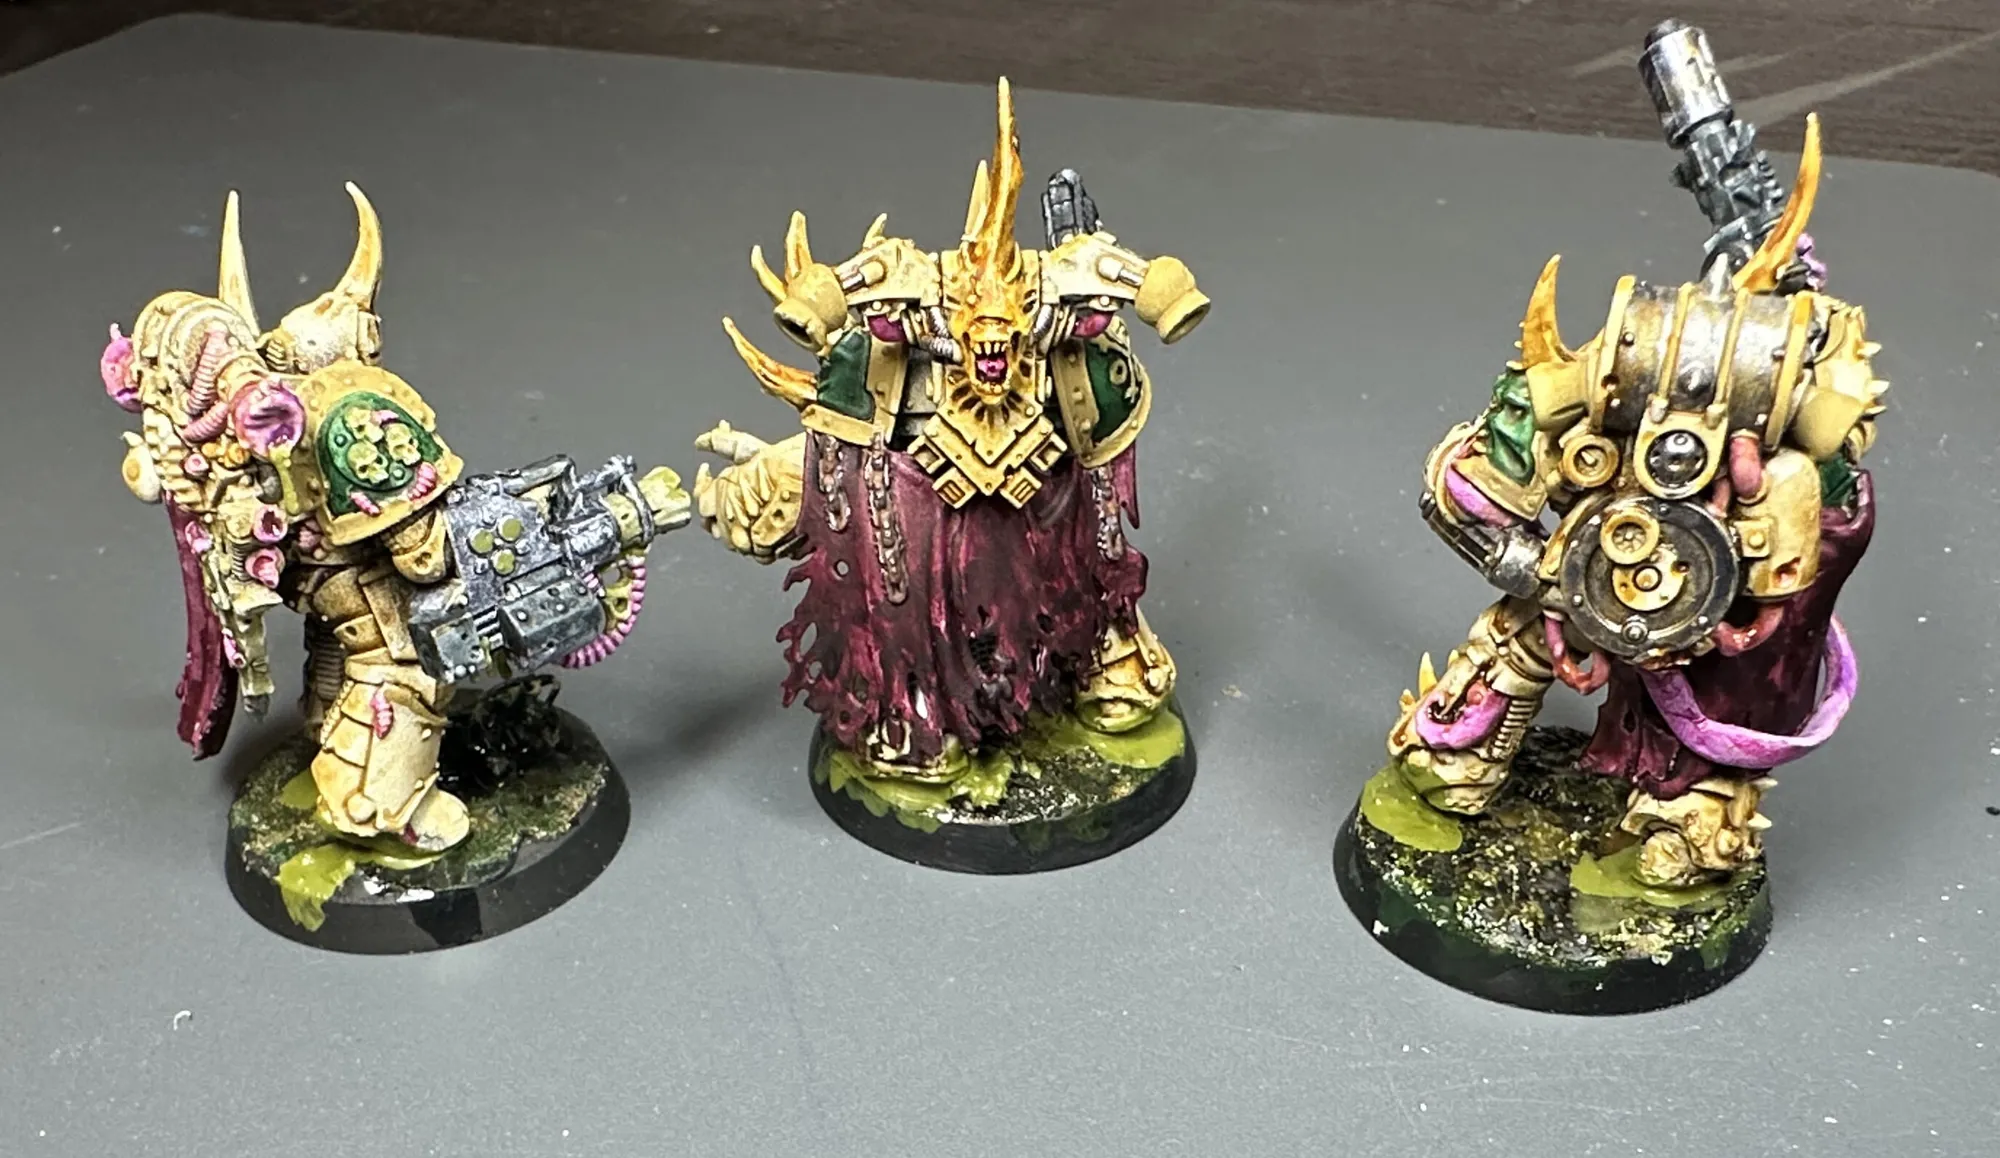
| 4 | Cloth and capes | Murder Scene (Red) — Speed Paint |
| 5 | Armor trim and plating | Green Brown — Vallejo |
The green shoulder pads are the classic Death Guard identifier. Absolution Green works, but honestly if I had to do it again I’d go with something a bit more sickly. Maybe like a desaturated, muted green that reads more as “this color has been through some things.” The dark bright green is fine, it just looks a little too healthy for a warband that’s been in Nurgle’s garden… marinating.
Murder Scene Red on the cloth gives you that contrast against the cool bone and green. It reads as dried and worn, but I wanted it to stand out a bit more, I still think it fits for cloth that’s been dragged through a plague ship.
Green Brown on the trim ties the green and brown tones together and keeps the trim from competing with the shoulder panels.
Metallics
| Step | Where | Paint |
|---|---|---|
| 6 | Gun base | Grim Black — Speed Paint |
| 7 | Gun metal, chains, melee weapons | Broadsword Silver — Speed Paint |
| 8 | Gun metal, chains, melee weapons | Rust Wash |
Gun gets a black base coat first, then silver on the metal parts. The rust wash over the metallics is doing double duty. It’s weathering the weapons and tying them into the overall grimy tone of the model. Don’t be precious with it. These aren’t going to a parade-ground anytime soon.
For bigger melee weapons and chunky metal bits, I follow up with light rust and dark rust applied with a sponge. Stipple it on! The randomness of sponge application looks way more natural than trying to paint rust strokes. That being said, you can use whatever to apply it.
Details
| Step | Where | Paint |
|---|---|---|
| 9 | Eyes and lenses | Slaughter Red — Speed Paint |
Quick and done. One coat of Slaughter Red in the eye lenses. You could do fancy effects with highlights, but honestly a flat red glow reads well on Death Guard, in my opinion.
Corruption!!!! The Fun Part
This is where the model goes from “30K Space Marine” to “something went very, very wrong.” Save this for after all the clean details are done. You’re defiling a finished marine, not trying to work around gross bits.
Flesh and Hoses
| Step | Where | Paint |
|---|---|---|
| 10 | Hoses, tongues | Familiar Pink — Speed Paint |
| 11 | Hoses, tongues | Flesh Wash, Purple Wash |
Familiar Pink reads as organic tissue that’s fused with the rubber tubing. I would recommend going a bit lighter with this. Too heavy and its hard to pull back the intensity. The flesh wash and purple wash over it will knock back the brightness and makes it look bruised and unhealthy.
Horns and Teeth
| Step | Where | Paint |
|---|---|---|
| 12 | Horns, teeth | Yellow Wash |
| 13 | Horns, teeth | Zealot Yellow — Speed Paint |
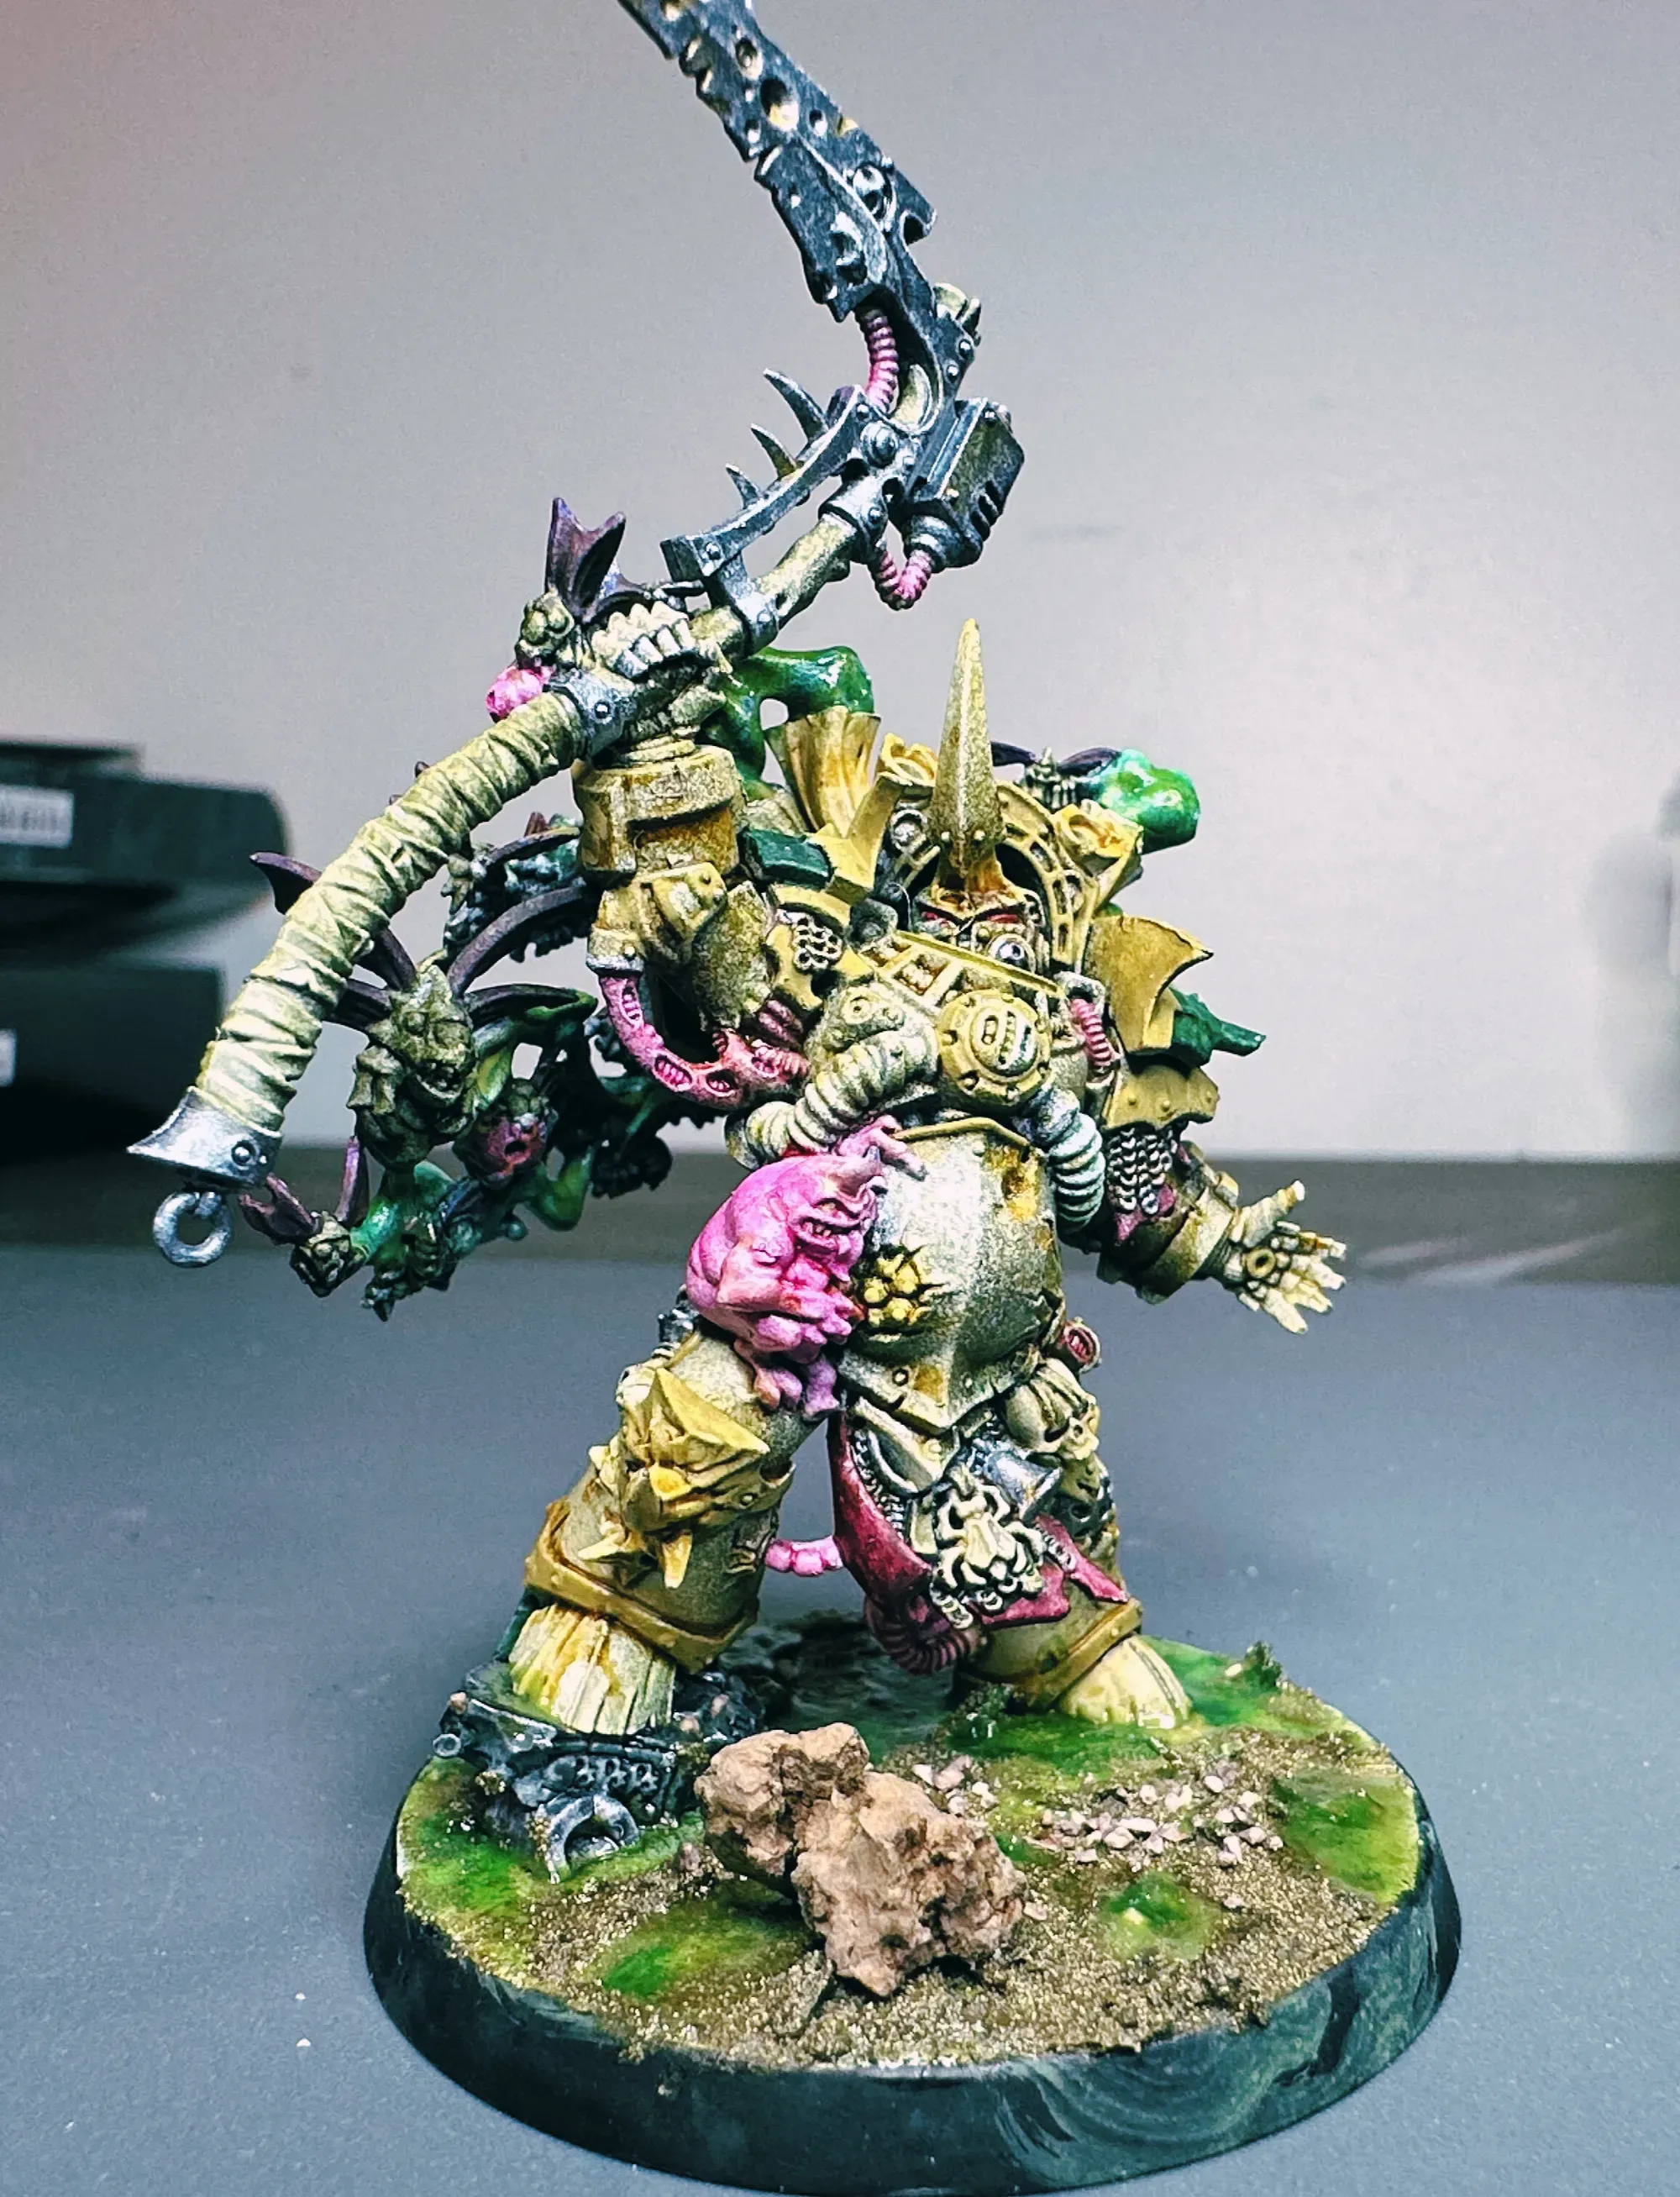
These start as Pallid Bone from step 1 (same as the armor, because the bone growths were part of the marine once). The yellow wash and Zealot Yellow push them from clean bone into diseased, rotting territory. The gradient from pale tips to yellowed base tells the story of corruption spreading from the source. The gradient was a bit challenging here. Again, I would recommend going lighter, and starting at the base while pulling the brush towards the tip of the bone.
Boils and Pustules
| Step | Where | Paint |
|---|---|---|
| 14 | Boils | Zealot Yellow — Speed Paint |
| 15 | Boils | Flesh Wash |
| 16 | Boils | Toxic Yellow — Vallejo |
Three steps but they go fast. Base yellow, wash to create depth around the edges, then a dot of Toxic Yellow right on the top of each boil. That bright dot is what makes them look like they’re about to burst. Gross. Perfect. It really sells the “please don’t touch me” vibe.
Skulls and Damaged Armor
| Step | Where | Paint |
|---|---|---|
| 17 | Skulls emerging from armor | Zealot Yellow — Speed Paint |
| 18 | Skulls emerging from armor | Flesh Wash |
| 19 | Damaged armor recesses | Rust Wash |
The skulls pushing through the armor plates get the same yellow-to-wash treatment as the boils. Rust wash in the damaged armor cracks ties it all together. Focus the rust near corruption zones where the belly is splitting, around boil clusters, and anywhere the warp is eating up the marine.
Extras
These aren’t numbered steps but more like things I picked up along the way.
| Where | Paint | Notes |
|---|---|---|
| Terminator leather armor | Desolate Brown — Speed Paint | If you’re doing Blightlord Terminators, the leather panels and straps get their own color |
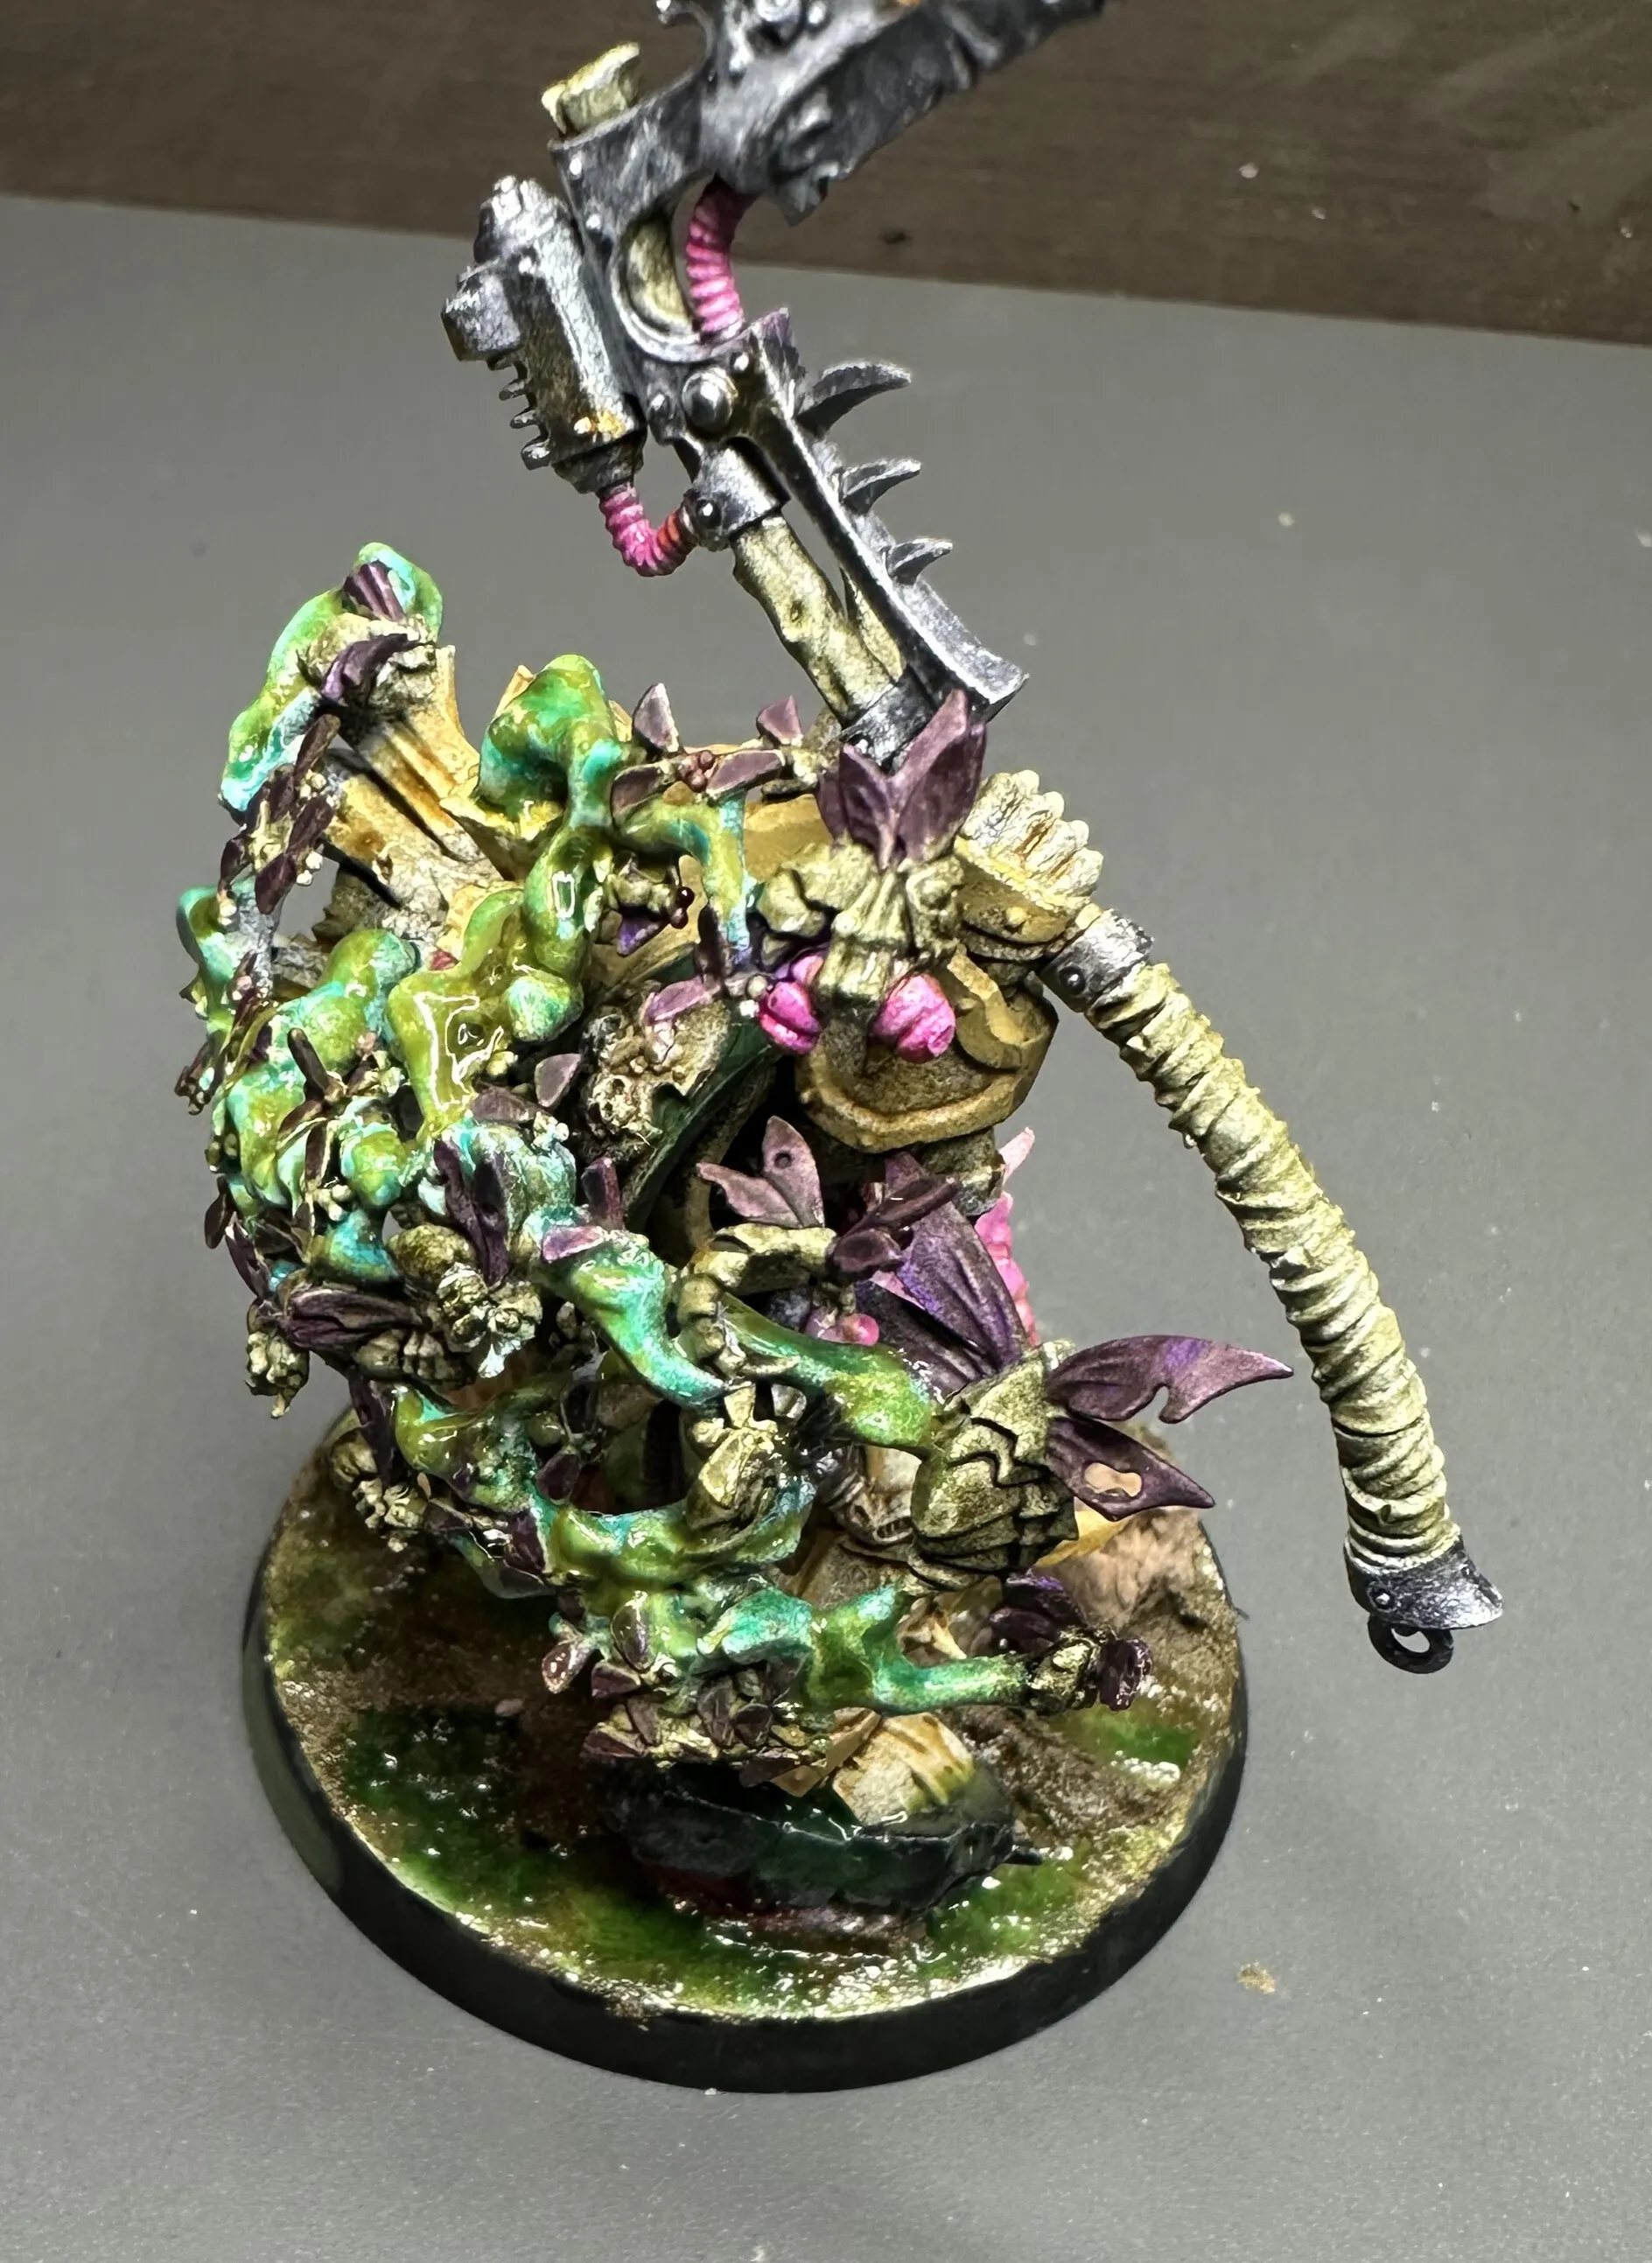
| Ooze and slime | Green-yellow mix — Vallejo & Water Texture | For any Nurgle’s Rot-style ooze dripping off weapons or pooling in joints |
| Big melee weapons | Light rust + dark rust — sponged | Stipple with a torn piece of sponge for random, natural-looking corrosion |
| Nurglings | Familiar Pink (or anything fun) | I went pink on mine but honestly go wild! Bright blues, weird greens, or whatever else. They’re little chaos gremlins, they should look like they’re having a good time |
Paints Used
Everything in one place if you’re shopping or checking your shelf.
| Paint | Brand / Type | Used For |
|---|---|---|
| Pallid Bone | Army Painter Speed Paint | Armor, bones, skulls, horn base |
| Absolution Green | Army Painter Speed Paint | Shoulder panels |
| Murder Scene (Red) | Army Painter Speed Paint | Cloth, capes |
| Grim Black | Army Painter Speed Paint | Gun base coat |
| Broadsword Silver | Army Painter Speed Paint | Metallics, chains |
| Familiar Pink | Army Painter Speed Paint | Hoses, tongues, nurglings |
| Zealot Yellow | Army Painter Speed Paint | Horns, teeth, boils, skulls |
| Slaughter Red | Army Painter Speed Paint | Eyes, lenses |
| Desolate Brown | Army Painter Speed Paint | Terminator leather |
| Green Brown | Vallejo | Armor trim |
| Toxic Yellow | Vallejo | Boil highlights |
| Green-yellow mix | Vallejo | Ooze |
| Sepia Wash | Wash | Armor recesses |
| Flesh Wash | Wash | Hoses, tongues, boils, skulls |
| Yellow Wash | Wash | Horns, teeth |
| Rust Wash | Wash | Chains, weapons, damaged armor |
| Light / Dark Rust | Weathering | Sponge-applied on melee weapons |
Things I Learned
They come out gross. That’s the point. I stressed about these models way more than I should have. Death Guard aren’t clean and they’re not supposed to be. Every time I thought I’d messed something up, it just looked more corrupted. Trust the process and lean into the mess.
The bases were a lesson in less is more. I mixed paint into basing glue to create the toxic Death Guard wasteland bases. For the characters and Terminators, I built it up in layers and they came out great. For the Plague Marines, I mixed too much paint into the basing glue on the first pass and it dried too solid. It looks more like a painted surface than a gross texture. I want to go back and build up another layer on top of those to fix it. But even the “mistakes” here kind of work. It just looks like a different stage of toxic sludge drying.
Messy is an aesthetic. Some of the basing glue spilled over the edges of the bases and dripped down the sides. Instead of cleaning it up, I left it. It looks like the plague is so bad it can’t be contained. It’s like corruption is literally oozing off the base. Could it have been done more intentionally? Sure. But it works, and sometimes the best effects come from accidents you commit to.
The old paint helped. Since these were repainted over a previous purple scheme, the repriming wasn’t perfectly smooth. That subtle texture and unevenness under the Pallid Bone actually contributes to a worn, used look that you wouldn’t get on a pristine model. If you’re doing this on fresh plastic, consider a light texture spray or an imperfect prime coat to get some of that character.
I’d change the shoulder pad green. Absolution Green is fine, but it’s a bit too vibrant for a warband that’s been festering in the warp for ten thousand years. Next time I’d go with something more muted and sickly. Like a gross green-yellow-grey that looks like it used to be healthier.
This is the scheme I use across my Death Guard army, including Plague Marines, Blightlord Terminators, and characters. For something completely different, check out my comic book style minis. It’s like the opposite end of the painting spectrum.
Gallery